
In my previous article to this, we discussed the creation of “empty” executables that do nothing but pause for a specified number of seconds. I also mentioned a technique I use quite a lot, the “post-logon offload trigger”, to create a custom trigger point that can be executed at logon time, but which gives the user the impression that the logon has actually finished before this trigger point is reached. Obviously this technique is best used on desktops (physical, virtual, or published through RDS or XenApp) – applying this to published applications doesn’t really have a lot of relevance, although you could use it if you had something that needed to kick in after the application was already launched.
Application of this concept
First let’s run through some possible use-case scenarios. This technique is all about bringing down the logon time, and logon time (along with application launch time and application responsiveness) is one of the metrics your average user uses to determine how good his session is.
Imagine you’ve got a complicated routine running in Environment Manager that involves a lot of processing. A common one is printer mappings. If, like many enterprises out there, you have complicated subnet-based printer mappings, you may be doing a lot of Condition and/or Group checking at logon time. You can use the Query function or some expanding of the various Conditions to narrow it down a bit, but you can’t get away from the fact that a lot of Condition checking takes up a lot of processing time in the wider scope of things.
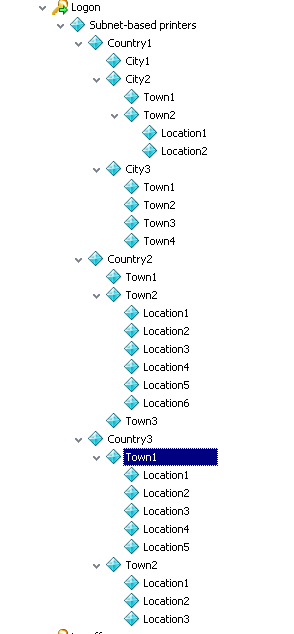 |
| An example of a complicated printer mapping node that performs a lot of subnet Condition checking |
For the purposes of this example, let’s assume we want to move a complicated printer mapping section – such as that shown above – into a Post-Logon Offload Trigger (you can call it a PLOT, if you like acronyms). It certainly should be acceptable – after all, generally a user has to open an application to print something, even if they do it from the Explorer right-click menu, which opens the relevant application and then closes it. This gives us plenty of time to map the printers in the background (relatively speaking), so that we can remove the printer processing from what is perceived to be the actual “logon” routine, yet still perform it as the user logs in.
Creating the trigger executable
This process was covered quite adequately in my previous post, but we will run through it again here to ensure this article is self-contained. Basically, we are going to compile an executable on the endpoint that we will then run using an auto-start entry, and then use the Process Stopped Trigger to initiate our new, custom Trigger.
We’re going to use the C# .NET compiler to create our executable, which on a machine with the latest .NET installed (at time of writing, October 2013) should be located in this path
%windir%\Microsoft.NET\Framework\v4.0.30319\csc.exe
But before we can compile an executable, we need the source file to provide the code for the compiler.
Creating the source file
The creation of the source file can be done via your Computer Startup Trigger, or alternatively you could simply drop the source file into your gold or master image if you’re using something like Provisioning Services or Machine Creation Services (or any one of a number of other technologies, in case anyone thinks I’m being a Citrix bigot – that moniker belongs to Carl Webster, and was, incidentally, the source of my name for this blog)
If you’re going to do it through AppSense – which would be the best way, because it completely removes the requirement to maintain the source file on your endpoints – you would do it like so
Create a new node with an appropriate name in the Computer Startup trigger
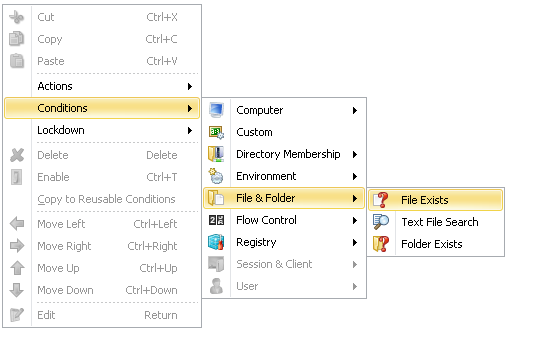
First we’re going to insert a Condition from Condition | File & Folder | File Exists to ensure that the file doesn’t already exist. After all, continually re-compiling it at every restart would be a waste of processing time, and the whole thrust of this post is about cutting processing time down 🙂
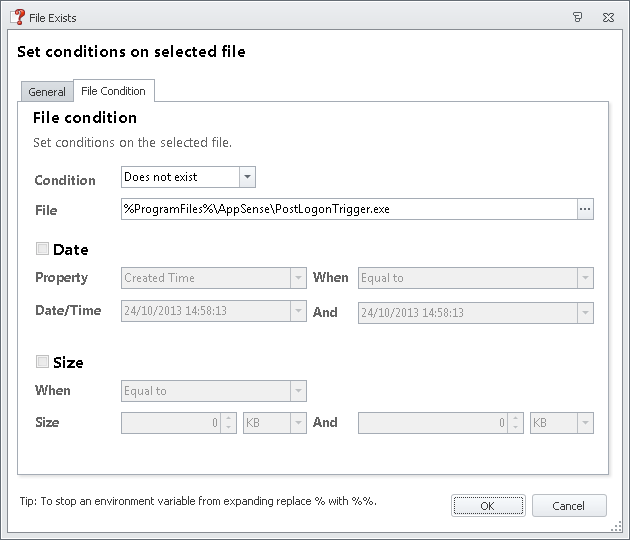
Let’s switch the Condition to “Does Not Exist” and insert the path for our source file also
Now, we need to add an Action that will create the source file for us if it doesn’t already exist, so use Actions | Custom & Execute | Custom Action to nest an Action inside the Condition we just created
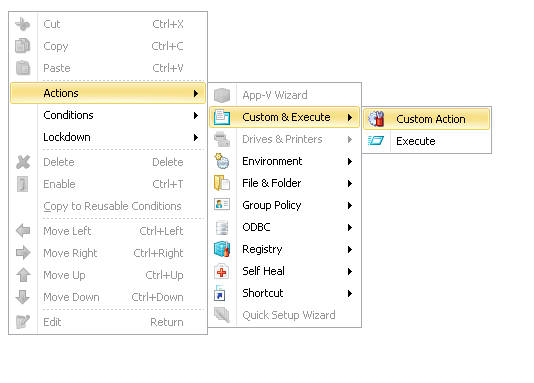
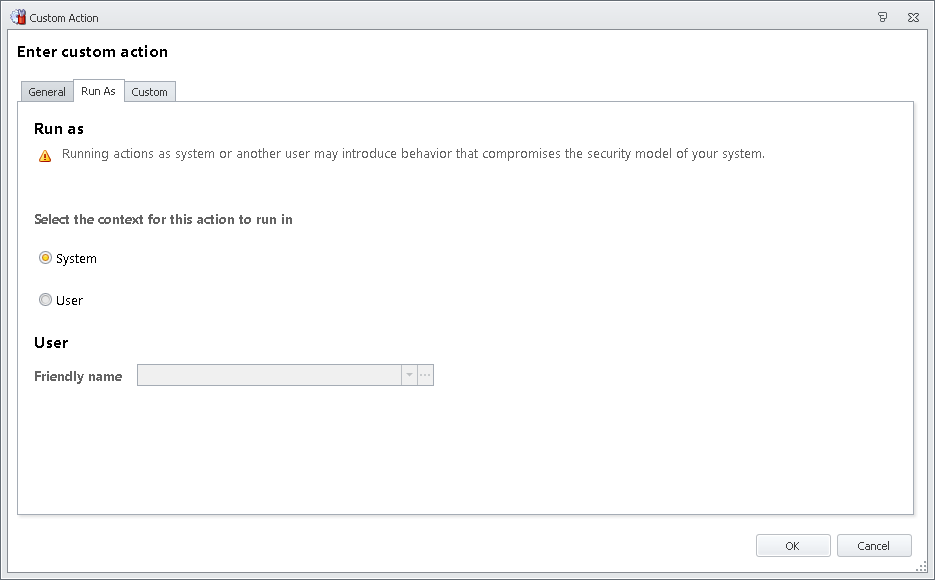
Set the Run As tab to execute as SYSTEM, as this is a high-privilege operation because of the file destination we are going to choose
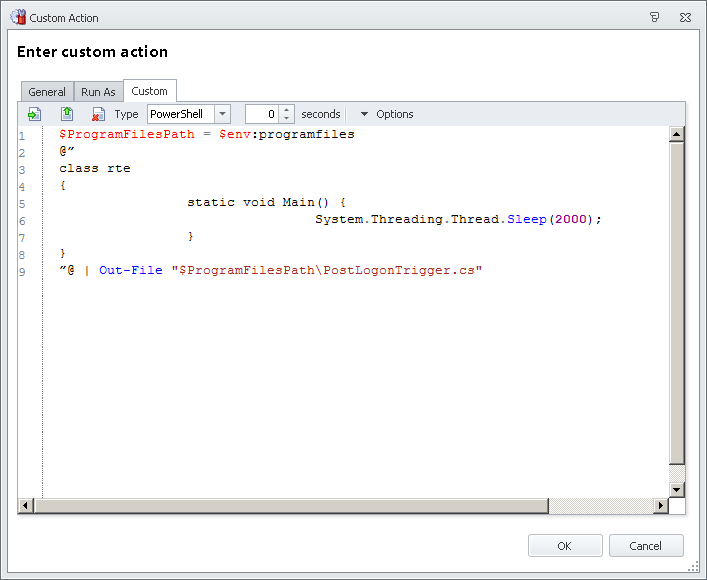
The code that we need to put into our source file is this
The key here is to change the Sleep(xxx) value to however long you want your executable to wait for after the user thinks the logon has “finished”. 2000 equals 2 seconds – you can set it shorter or longer as required. Obviously, the maximum value you can use is the amount of time you think will elapse before the user could conceivably need to use any of the functions you provide in this custom Trigger, minus the amount of time it takes the Actions in the custom Trigger to run.
To get mathematical
x = y – z
where x is the maximum amount of time you can allow your executable to run for
and y is the time before the user may need any of the functions provided in the new Trigger
and z is the amount of time it takes the Actions in the new Trigger to process 🙂
So we will use a bit of PowerShell provided by Aakash Shah and tidied up by Michael B Smith to insert this text into our source file with the correct formatting
which should leave our Action looking like this
Compiling the executable
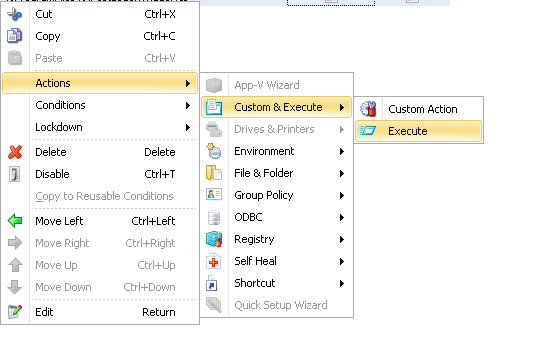
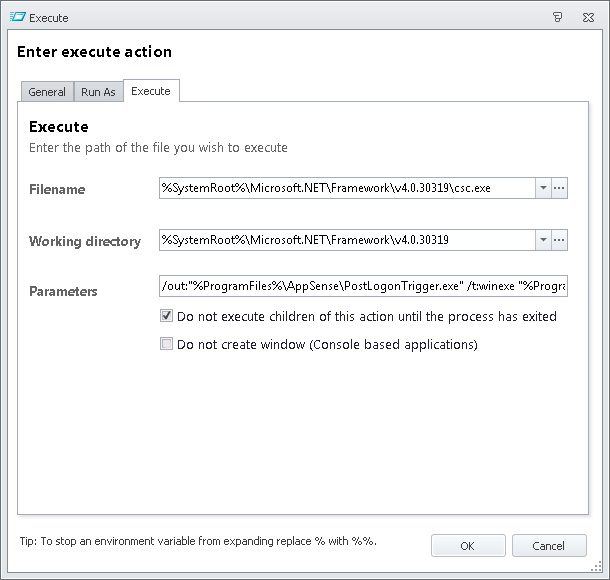
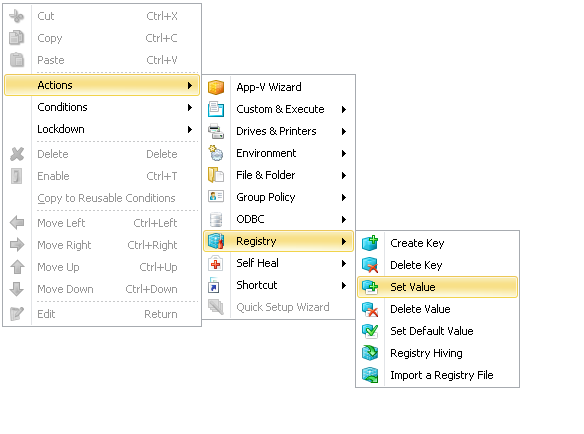
The next step is to create a child Action of the Custom Action above which compiles the executable. This will need to be an Execute Action, as we are calling an existing binary, so you will need Action | Custom & Execute | Execute
The details of the Execute Action then need to be provided to match the path we mentioned earlier (unless this path has changed, best to check where your latest csc.exe resides!), but also adding various parameters
/out:”%ProgramFiles%\AppSense\PostLogonTrigger.exe” – to tell it where, and in what name, to drop the executable
/t:winexe – to create a Windows executable rather than a console one
“%ProgramFiles%\PostLogonTrigger.cs” – to specify the input source file
The “do not execute children” option also needs to be set, so your Execute Action should look like this
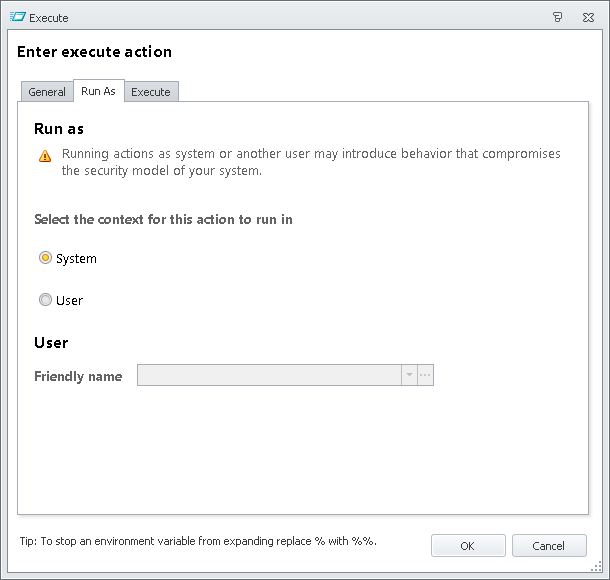
and you also need to ensure this Action is also set to Run As SYSTEM
Tidying up the source file
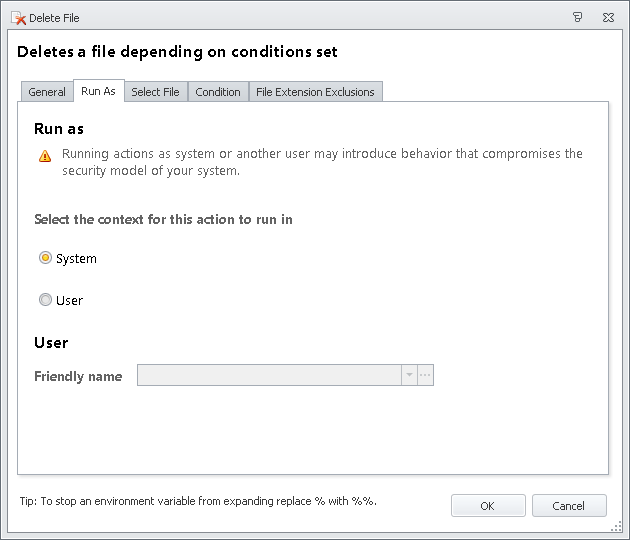
Once we’ve done this, the source file we’ve created will be redundant, so we can add another child Action to remove it by using Action | File & Folder | Delete File

set the options as so

and once again, ensure that this Action runs as SYSTEM, because removing files from %ProgramFiles% is a high-privilege operation
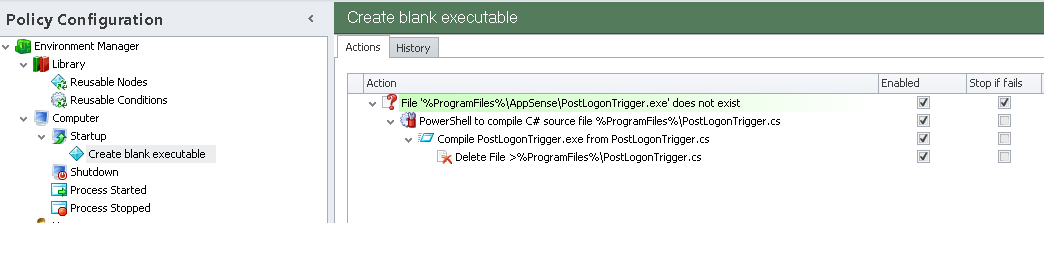
Now your entire node should look like this
And that’s the first part finished!
Running the custom executable at logon time
The next thing to do is introduce a setting that will ensure that the executable we are creating in the Startup trigger actually runs as the user logs on, but as late as possible.
The place I’ve had most success with is the HKEY_CURRENT_USER\Microsoft\Windows\CurrentVersion\Run key. The Startup part of the Start Menu seems to execute later than this, but then there’s the problem users may actually click on the link and initiate the whole set of Actions again, which isn’t ideal.
So what we need to do is create a Node in the User Logon Trigger and name it as appropriate
And then create an Action from Action | Registry | Set Value
with the settings as shown below

This is all that’s required to set this part up – this will be processed as the user logs in and execute once the shell successfully starts.
Initiating our custom Trigger
So now, when the user logs in, PostLogonTrigger.exe will run for the length of time you specified in the source file, and then exit. What we need to do is use a Process Stopped Trigger so that when it exits, our “offloaded” Actions then begin.
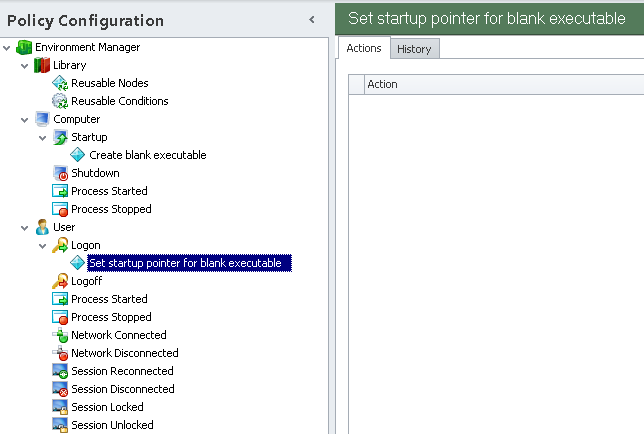
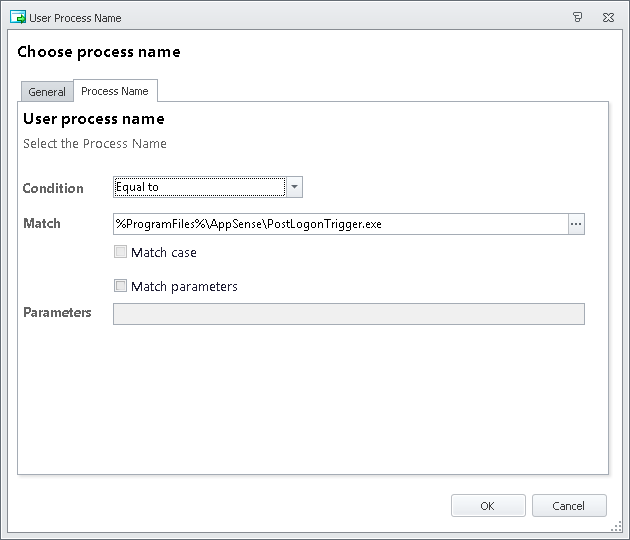
First create a new Process Stopped node and specify the executable path
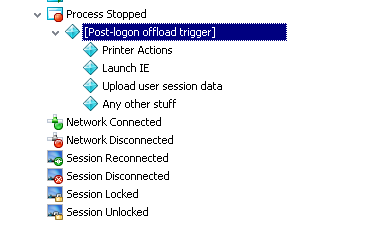
You will then have to rename the Node to something intuitive – such as “[Post-logon offload trigger]” – as the dopey AppSense Environment Manager Console gives it a default name of “node”, which is a bug they still haven’t ironed out

Now you’ve got the Trigger prepared, you can add as many Actions as you want as children of the Process Stopped Condition. Anything that the user needs to be set at logon, but doesn’t need to use immediately and/or slows your logon down, you can dump in here for processing after they think the logon has already finished!
Summary
This is a really nifty way of getting problematic Actions out of what your users perceive to be the “logon” process yet still initiated ready for the users to utilize them from their applications. Anything specifically application-dependent should obviously use the relevant Process Started trigger where possible, but I’ve had great success using this method to reduce logon time, especially in places where the Environment Manager configuration is badly put together, but the client are reluctant to change too much of it.
Hopefully this can really help out some people out there who aren’t having much joy with their logon times. Essentially, this just delays the slow-processing Actions, but by moving it to a time where the user doesn’t perceive this drag as part of the logon, it will allow users to feel their experience has improved. However, in the long run, you should really try and iron out the problem areas in your logon process rather than just hiding them behind this custom Trigger!
The configuration I put together in this article is available here, should you wish to look at it.
Credits
As mentioned in the previous article, Jorrit van Eijk of AppSense deserves great credit for the initial implementation of this that encouraged me to find my own way of doing it. And also thanks to the guys over on NTSysAdm for help with my terrible scripting skills 🙂

