
I recently wrote an https://www.astroarch.com/tvp_strategy/appsense-desktopnow-deployment-without-overheads-24619/, this article concentrated on SCCM as the delivery mechanism, but given that System Center Configuration Manager is (in my opinion), a big, complex and expensive beastie to get up and running, I thought I would do a feature on deploying AppSense agents and configurations using nothing more than Active Directory, which is by far a more ubiquitous technology to find – especially in smaller environments.
Active Directory Group Policy Objects have been around for a long time as a “lite” software deployment mechanism. The advantage of them is that they are quick and easy to set up, and can usually be found in even the smallest of environments. They aren’t immensely reliable, they’re fairly limited, and they seem to get damaged occasionally, but they are nice and simple to manage and can be recreated in a matter of minutes if you get any problems.
You can also “slipstream” MSP files (patches, which AppSense use for hotfixes and service packs) into the standard MSI files by using standard Windows commands, reducing the amount of work you’ve got to do. It sounds promising…
Preparation
Now you can either install these pre-requisites into your base image, or try to deliver them through AD. However, as AD Software Installation Policies only work with MSI files, you will need to extract the files from the provided .exe packages if you want to find the MSI files to do this. If AppSense ever get up to using the Visual C++ 2012 Redistributables, you will need to get a bit more imaginative – see this post from Nicke Kallen. I’ve personally done them via AD GPOs, after a bit of tinkering.

Next you will need to get the relevant files and patches from the DesktopNow software bundle into an accessible location. For purposes of posterity, we are using EM 8 FR4 for this demonstration – change as necessary.
At this point, it’s time to select your onward path. The bad news is….AppSense don’t support any modification of their installation files, so as we were counting on using the slipstreaming trick to roll service packs and patches into the base installer files, we are actually looking at modifying the MSI files. So….if you want to avoid invalidating your support contract, you can only use the AD Software Installation Policy to deploy the original MSI file, not the patch. Fear not, though – we will discuss an alternative, supported, method of installing the MSP file in the relevant section.
Update – AppSense will support slipstreaming patches but they do recommend customers avoid doing this. That said, if this is the only approach available to customers they will work with the customer to resolve any issues experienced within the environment.
That being said, you will need to be aware of the following:
If you’re adopting the slipstreaming measure you will not be able to patch the installed product and will need to slipstream patches into a new slipstreamed MSI. Consider the following scenario:
Environment Manager 8.4 SP2 has been slipstreamed and installed on an endpoint. Windows installer will see this as Environment Manager 8.4.309.0 installed on an endpoint instead of Environment Manager 8.4.195.0. When you come to install service pack 3, Windows Installer will look for the base product with the version 8.4.195.0 and because this doesn’t match, installation will not be allowed. You will need to slipstream SP3 into the original MSI and then do a complete un-install and re-install in order to perform an upgrade. Essentially, you will be at the same stage with Environment Manager before it supported patching.
If you’re setting up a POC, test or lab environment, then slipstreaming the patches into the MSI files should work just fine. For any live environment, you’re going to have to use the standard method, or risk AppSense support telling you unceremoniously to f**k off when you have an issue. There’s also the possibility that you may run into some issues trying to install future patches. As the knight in Indiana Jones said – “choose wisely”.
Method #1 – the Slipstreamed method
Copy the relevant MSI installer files for the EM Agent, AM Agent and PM Agent to your file share, along with any associated MSP files. Note that the CCA is not required – this agent merely facilitates communications with the Management Server and Personalization Server, and if we aren’t using these, it is completely irrelevant.

First we need to unpack the MSI into an administrative installation point. Do this by running this command
msiexec /a C:\FileStore\AppSense\EnvironmentManagerAgent64.msi

An install process will begin

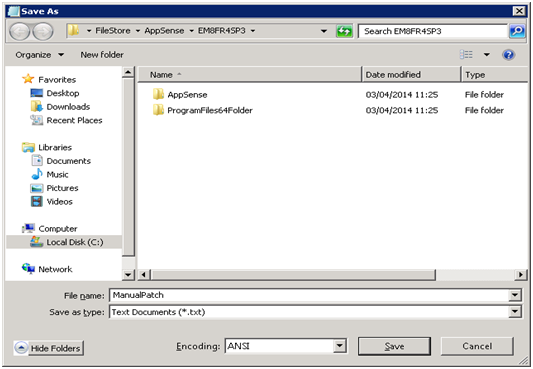
During the install procedure, you will be asked for a path to the install point. Use a subfolder (for instance, in this case we’re using the subfolder EM8FR4SP3

Once the install has finished…

…you should see that the MSI file has been “unpacked”, effectively, to the EM8FR4SP3 subfolder.

Now, what we need to do with the EnvironmentManagerAgent64.msi file in the subfolder (NOT the original one in the parent folder) is apply the MSP patch to it. We do this with the command
msiexec /a “C:\FileStore\AppSense\EM8FR4SP3\EnvironmentManagerAgent64.msi” /p “C:\FileStore\AppSense\EnvironmentManagerAgent64.msp” /qb

This will slipstream the MSP into the new MSI file we unpacked.

If we look in the subfolder, we can see that the date/time stamp on the MSI file has now been updated (it’s now 11:30 instead of 11:25 in the earlier image)

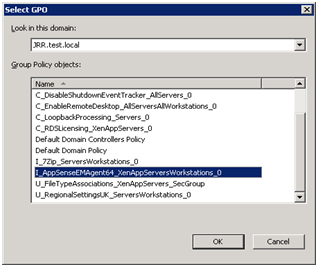
Now we can package this as a Software Installation GPO. Create and name the GPO

and disable the User Configuration Settings.

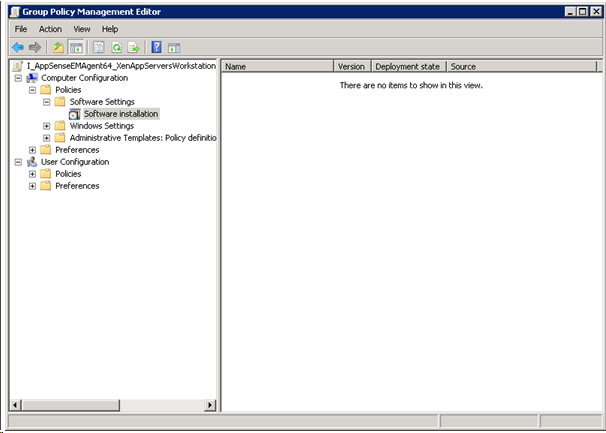
Go to Computer Config | Policy | Software settings | Software installation policies and create a new package.

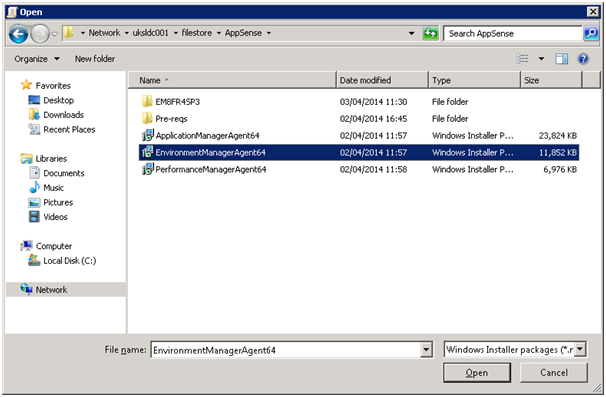
Choose the MSI file that we updated from the dialog box (the one from the EM8FR4SP3 subfolder)

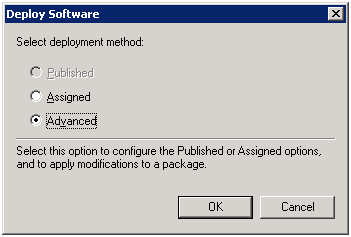
Next, choose Advanced for the installation type.

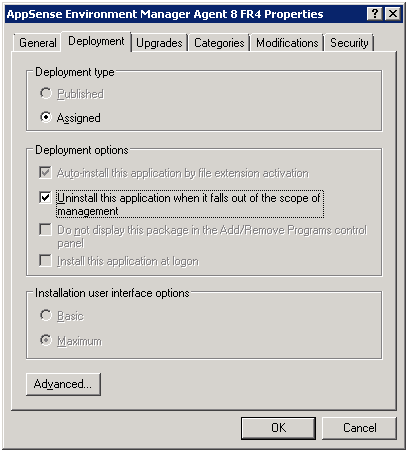
On the Deployment tab, check the box to remove the application when you unassign it from your target devices, making it easier to remove and reinstall if necessary.
Now link the GPO to the OU required, and restart the machine.

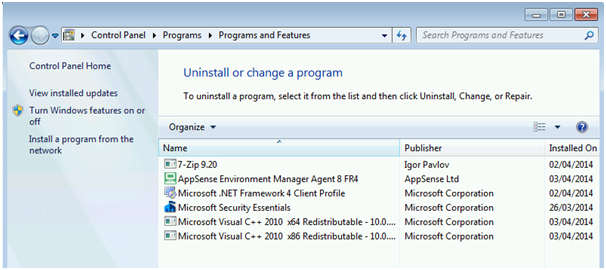
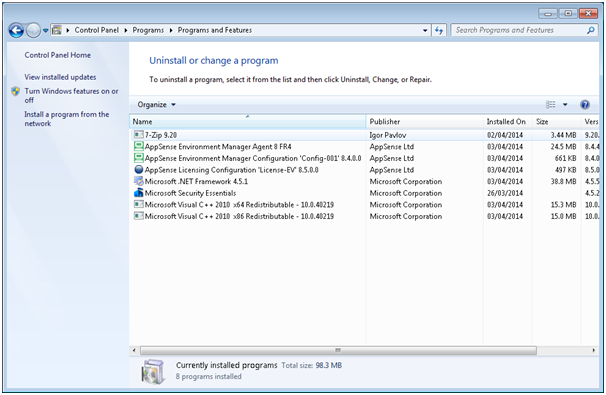
You should, after the restart, see that the software has installed successfully, and incorporated the slipstreamed MSP file (shown by the fact that this is EM 8 FR4 SP3 rather than just EM 8 FR4). A note – be patient! AD Software Installation runs after all other Group Policy Processing is finished, so sometimes you may need to wait for some time after the machine has booted up, or, if you’re too impatient, go for a second reboot.

Method #2 – the Standard method
Copy the relevant MSI installer files for the EM Agent, AM Agent and PM Agent to your file share. Note that the CCA is not required – this agent merely facilitates communications with the Management Server and Personalization Server, and if we aren’t using these, it is completely irrelevant.
We can package this straight up as a Software Installation GPO. Create and name the GPO
and disable the User Configuration Settings.
Go to Computer Config | Policy | Software settings | Software installation policies and create a new package.
Choose the original MSI file
Next, choose Advanced for the installation type.
On the Deployment tab, check the box to remove the application when you unassign it from your target devices, making it easier to remove and reinstall if necessary.
Now link the GPO to the OU required, and restart the machine.
After the restart, you should see Environment Manager Agent FR 4 showing as installed, which is the base version without any modifications. A note, the same as mentioned in the slipstreaming method – be patient! AD Software Installation runs after all other Group Policy Processing is finished, so sometimes you may need to wait for some time after the machine has booted up, or, if you’re too impatient, go for a second reboot.
Next we need to somehow install the MSP file without modifying the existing MSI file. How can we do this without interfering with the GPO we’ve used?
The obvious answer is some form of script – ideally PowerShell. PowerShell can easily be used to call the msiexec process with the /p switch, which will allow us to patch the installation. We could launch this from a Group Policy Startup Script.
However, we don’t want to be re-running the patch at every startup. Is there a way we could query something – like the file version – and use that to decide whether to run the script or not?
Let’s have a look at some PowerShell that might do the trick
$filever = $output.replace(“.“,“”)
# Change or check value after -lt in next line to align with latest available version of software
# This number refers to EM 8 FR 4 SP 3
IF ($filever -lt 844950)
We are pulling the file version, stripping the periods out to make it a numerical string, and then comparing that with the version we want to be at. If we’re not at the right level, run the patching – if we are at the right level, just exit. Obviously you will need to update the comparison string as new patches come out.
A quick note from Ben Scott on this method of pulling out file versions – testing version numbers is one of those things that you’d think would be easy but ends up being ridiculously complicated. Removing separators and just treating it as one big number seems like a good idea unless you want to compare version 11.2 with version 1.13. A very good point, and one you may have to address if you’re using this when new major version numbers come out.
This may be an easier method in view of Ben’s comments…
$FilePath = ‘C:\Program Files\AppSense\Environment Manager\Agent\EMCoreService.exe’
$ver = [Version]( get-command $FilePath ).FileVersionInfo.ProductVersion
If ($ver –lt [Version]‘8.4.495.0’)
{
Start-Process -FilePath “$env:systemroot\system32\msiexec.exe”-ArgumentList “/p \\UKSLDC001\FileStore\AppSense\EnvironmentManagerAgent64.msp/qn” -Wait
}
Now, because we are using Group Policy to do this, we need to save the script as a .ps1 file in an accessible location.
Next, we need to create a Group Policy Object that will run this script. But what we also need to do in our GPO is set the PowerShell execution policy so we can execute remote scripts, as this is hosted on a remote file share.
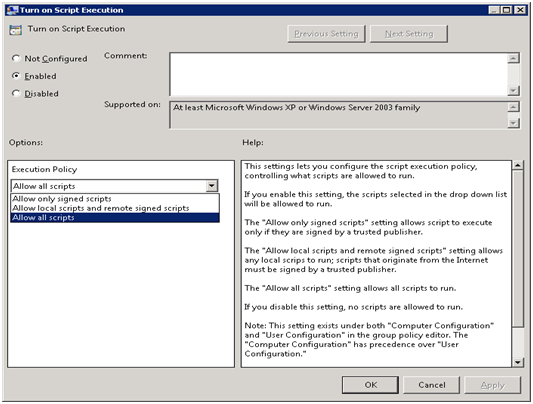
The execution policy is in Computer Configuration | Policy | Administrative Templates | Windows Components | Windows PowerShell | Script Execution. Set it to Allow All Scripts or Allow Local Scripts and Remote Signed Scripts as you require.
Next, we need to configure the GPO to run the Startup Script (I used a separate one, but you can put it in the one with the PowerShell execution policy if you want). We will need to configure Computer Configuration | Policy | Windows Settings | Scripts (Startup/Shutdown) | Startup. There is now a choice of tabs (which I’ve never seen before – shows you how long it is since I used scripts in Group Policy!) We need to select the PowerShell Scripts tab, as PowerShell files won’t run properly from the other one. Add the .ps1 file in we saved earlier using the Add button.
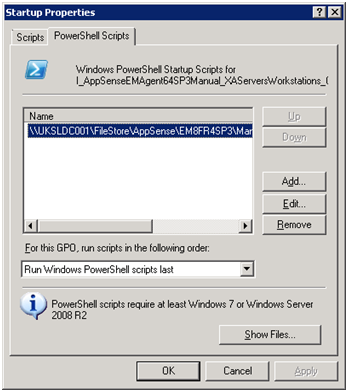
You will notice you can even configure whether the PowerShell scripts run first or last in the GPO – as we only have the one script in this situation, it doesn’t really matter.
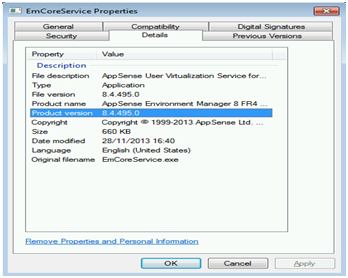
So now, when we restart, we should see that the AppSense Environment Manager agent has been updated (by the file version number, as this doesn’t seem to update Control Panel straight away).
One possible issue with this approach is that if you apply the Software Installation GPO and the patch script GPO to a device at the same time, it’s possible that the patch script may run first and therefore not apply until the second reboot. To get around this, you could actually run the patch script GPO as a Shutdown rather than a Startup script – this should work quite nicely, even though it’s a little unorthodox and needs a second restart.
There’s also the possibility that transient conditions to your file share or AD may make the Startup Script fail, as it looks for a network location. In this case, I’d recommend using a Group Policy Preferences File action to copy the script locally. Then, as above, run the script as a Shutdown Script. GPP will continue to try to process after logon whereas a Startup Script won’t, which means it should help in this situation.
I’ve tested these possibilities – both the GPP File and Shutdown Script deployment – and they work as expected, provided they’re configured correctly.
The next step – Licensing
Now we have our AppSense agent installed. You can repeat the process – either slipstreamed or standard – for both the Application Manager and Performance Manager agents.
However – we need to install a license, or it won’t work at all! How do we do that in this configuration?
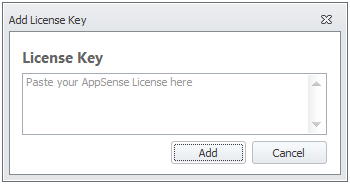
There’s something you’ll find in the Products folder of your DesktopNow bundle called the LicensingConsole. Install it somewhere, and then run it. Click the Add button and add in your license key and activation code.
Now, you should see that your license is installed and active.
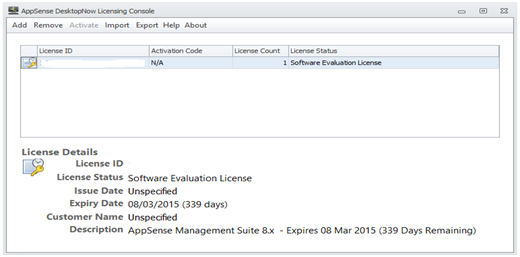
Also, you can see in the image above there is an Exportfunction on the menu bar. Clicking this will allow you to export the license as an MSI file (bet you can see where this is going!)
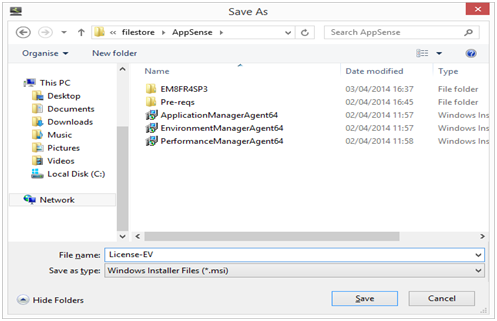
Now, you need to package this up as a GPO Software Installation Policy again, so go ahead, create one for your licensing file and deploy it to your endpoint(s).
After a restart, you should see that the license is now installed. Cool!
Configuration
Where would you be without a configuration? Sure, you’ve got the agent – but it’s the configuration that helps you do all those things that make a difference.
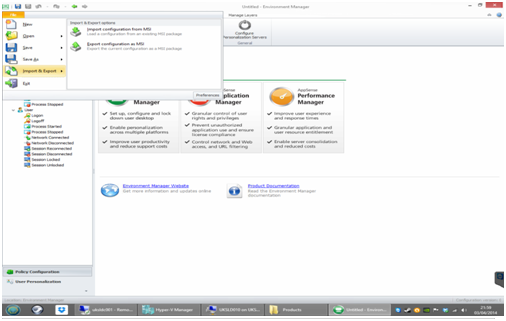
This one is more straightforward – install the relevant console somewhere (in this case, the EM console), and create a configuration. When you got to save it, use the File | Import & Export function instead, and choose to Export as MSI.
You know what to do next – package the MSI up and deploy it via GPO. So now you have agent, license and config all fully installed!
Possible errors from Software Installation Policies
Some other important things I’ve learned about Software Installation GPOs – don’t try editing them once they’re assigned, and they do get corrupted easily. The event logs should show you if there’s an issue along these lines (see example below)
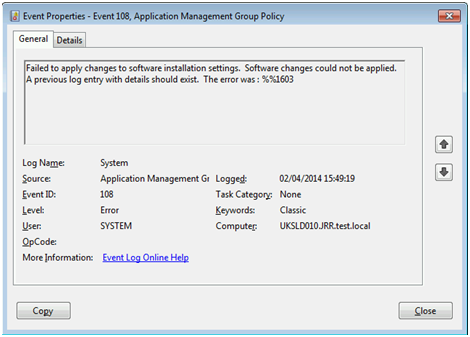
AppSense software generally only has a couple of errors, so you may not see much intuitive stuff in the event logs. In these situations, unlink and delete the GPO, then recreate it from scratch. This is a bit of a pain when it happens (although it only takes a few minutes), but that’s the price you’ll pay for free software deployment 🙂 Some commonly-seen errors are below
1603 – fatal error during installation (could mean anything, to be fair, from a missing pre-req to a corrupted GPO)
1274 – foreground sync required (this means that you didn’t wait long enough, as I alluded to earlier)
1625 – a configured Group Policy is preventing the installation(usually the one that disables Windows Installer) If you’re having real problems getting the software to install automatically, try installing it manually from the fileshare you configured, and see if there are any errors thrown there.
Limitations of this approach
If you do things this way, you have no centralized – well, anything. If you need to see which endpoints have which agents or configs installed, you will need to do some scripting. PSInfo springs to mind as something that may help here – PowerShell probably can do the job as well.
Alerts and events will be logged locally, so again, some scripting or third-party utils will be needed to see an overview of errors and information. However, if you’re using this method, you are unlikely to have a huge infrastructure in which centralized logging is paramount – local logging may suffice for your needs.
Anyway, it’s been an interesting journey trying to get this to work in this fashion. Certainly, when I need to spin up some quick test endpoints, it’s much easier to be able to do it simply from my DC rather than standing up SQL and everything else required. I’d be interested to see if people find other uses for this method in the real world.
Credits
Thanks to Richard Thompson (once again) for taking the time out to inform me about the unsupported-ness of slipstreaming patches, and to Michael B Smith and Aakash Shah for helping tidy up my PowerShell a bit.

