As I promised a while ago, let’s today try to do a bit more on the Windows 8.1 side of things, as I have been spending more time than I’ve wanted to digging around inside, as C3PO might have said, its busty innards. Naturally, we’re going to be leveraging AppSense DesktopNow Environment Manager to help us out with the customization and personalization of the Start Screen and UI, but for those of you who aren’t AppSense customers, then the basic principles should remain the same.
Update – thanks to Tom Scase and Simon Bond, I’ve written up a much easier way to get this working. Whilst the method discussed here remains viable, the method in this post is far more robust and would be the recommended way of achieving this end.
Windows 8.x introduced a few major, in-your-face changes to users, so if you’re upgrading them to this platform, the first and most noticeable change for them will be the appearance of the Start Screen to greet them. You can turn it off with Windows 8.1 so that they don’t see it when they boot in to the desktop, but when they hit the Start “button” or press the Windows key (or even Ctrl-Esc for those of you who remember the days before the Windows key), the Start Screen will be there in all of its supposed glory.
This probably isn’t anywhere near what you’d want your users to be presented with in a corporate environment. For the purposes of this experiment, we will assume we want to present them with a default set of settings, such as:
- Email (Outlook)
- My Documents shortcut
- Browser
- An App-V application (Notepad++, for the purposes of this demo)
What we also want, though – the key part, as far as I am concerned – is to also allow them to customize it for themselves, so they can pin items to their Start Screen as much as they like. This is the clincher – Microsoft provide a GPO called Start Screen Layout (one of the few they have deigned to allow us in Windows 8.x) for setting a default Start Screen layout, but it has some issues. It is set up using PowerShell cmdlets – these are discussed below.
Export-StartLayout is the PowerShell cmdlet you use to export out the desired Start Screen configuration. It can export as a BIN or XML file, but there are caveats around this. When you’re using the GPO specified above, you need to use an XML file generated by this cmdlet to provide the source.
Import-StartLayout is the cmdlet that imports it back in, but this a) only works using the BIN file, and b) only imports the settings into the default profile on the machine. It’s supposed to be used on mounted WIM images, but it will also work on the current Windows install.
The key thing to take away from this is that the way you deploy your default Start Screen layout will depend on the profile type you are using. If you’re using local with flip-to-temp (which leverages the default profile), it will be simpler. If you have a mandatory/default/other profile type in use, then it will be a bit more tricky.
Default/mandatory/other profiles
Now I’m sure you’re thinking, by far the easiest way to achieve this for these profile types would be to pin a few items to the Start Screen in the default or mandatory profile, and then enable for Personalization Server. But sometimes you don’t have this option – maybe you are migrating existing profiles across, or the default/mandatory profiles have already been sealed and dropped into images or onto network shares, or maybe even you want to be able to edit the default items without recreating the base profile. So we will approach this from the perspective of deploying a default set of shortcuts to the Start Screen without involving editing default or mandatory profiles.
Another situation (which I encountered recently) is that when using SCCM or another build process to create the machine, sometimes all the apps aren’t installed at a particular time – they are layered into the build via the task sequence. Creating the default profile in this case with the shortcuts pinned to the Start Screen simply created an unholy mess, because apps were imported that weren’t actually installed yet. In this case also, using a separate method to import the default settings is very necessary.
Personalization Server and Microsoft’s under-the-hood shenanigans
The other consideration to bear in mind is that Personalization Server, unfortunately, isn’t straightforward when it comes to the Start Screen. Remember the mess Microsoft made of Taskbar Pinned Items, with the eclectic (sarcasm) combination of files and binary Registry keys to populate them? The Windows 8.x Start Screen brings more of the same misery, with Microsoft insisting on overwriting Personalized settings with their own default set of garbage at logon time.
A big tip of the hat towards Richard Thompson here, who did a great piece on his blog which we are going to be referencing very heavily here (I believe credit is also due to Richard Bancroft of AppSense Professional Services for his work on this). In fact, the two Richards have done most of the heavy lifting for us, to be fair, and we are simply going to be adding in a few bits to their process.
First things first
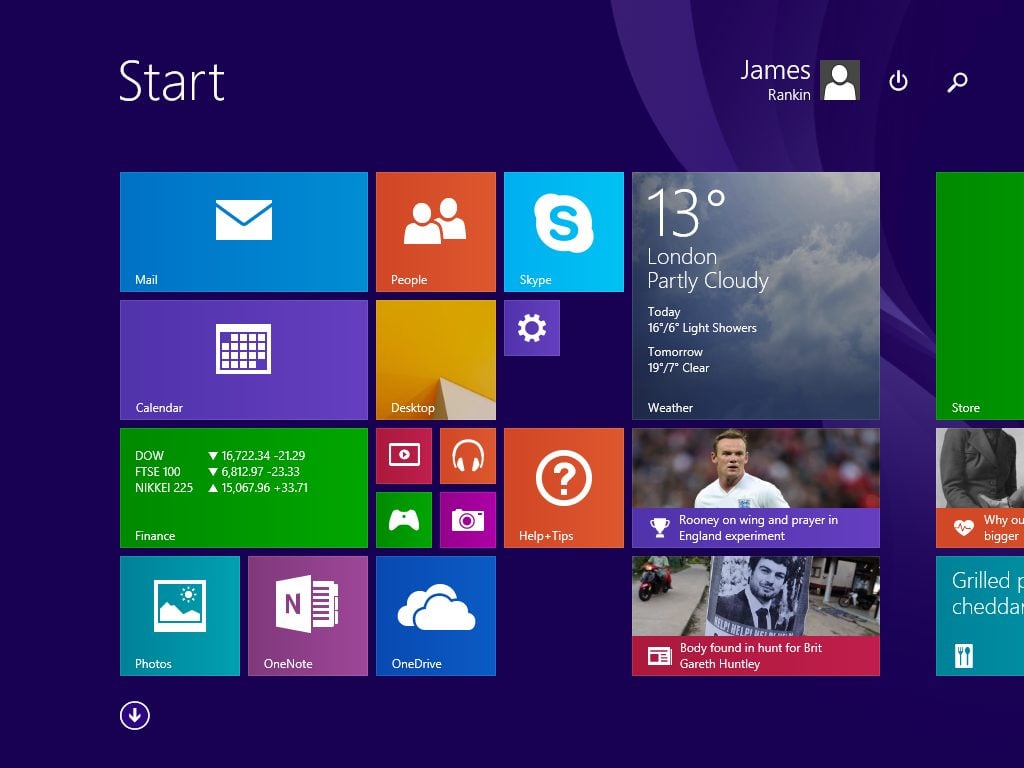
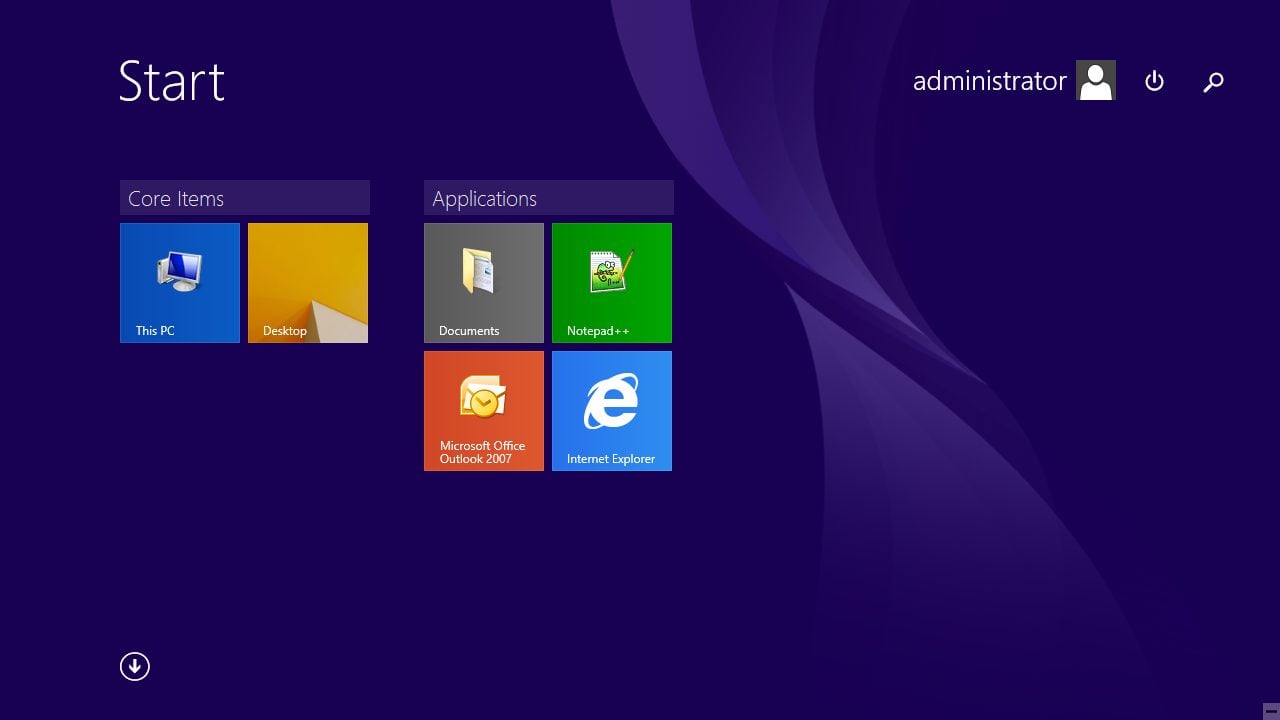
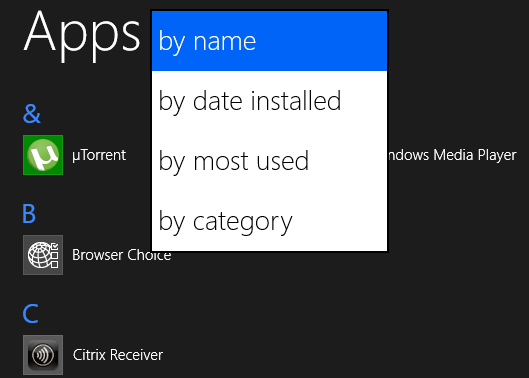
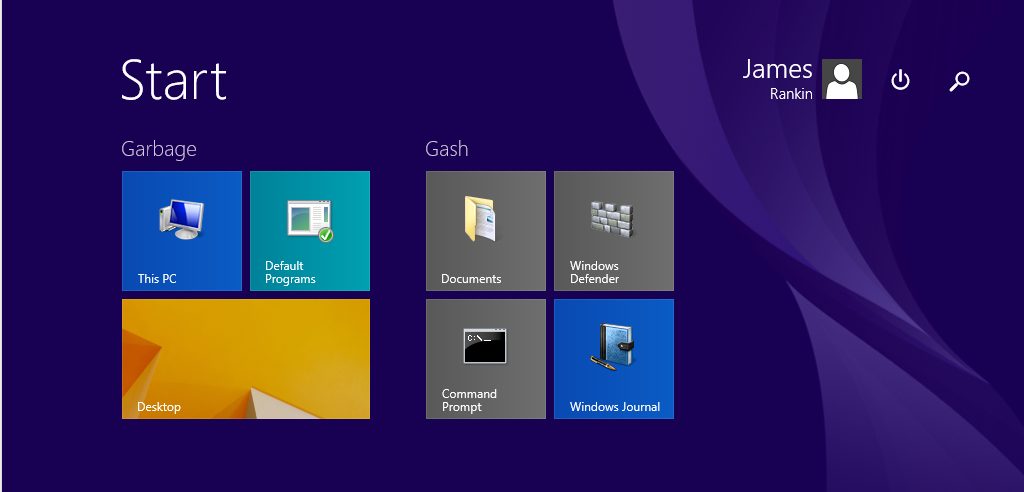
Firstly, let’s get the default set of items configured the way that we want them. Log on as an ordinary user, and let’s remind ourselves again of the rainbow dog-vomit mess Microsoft wants to lumber us with…
Ugh. Honestly, every time I see this screen, I’m just reminded how drastically unsuitable it is for a corporate environment. We’ve all gotten used to strimming the guff out of Windows operating systems down the years, but Windows 8.x not only succeeds in being so drastically in-your-face about all this crap, it also denies you any enterprise-grade tools to remove it with. Anyway – set your sights and tear it to pieces!
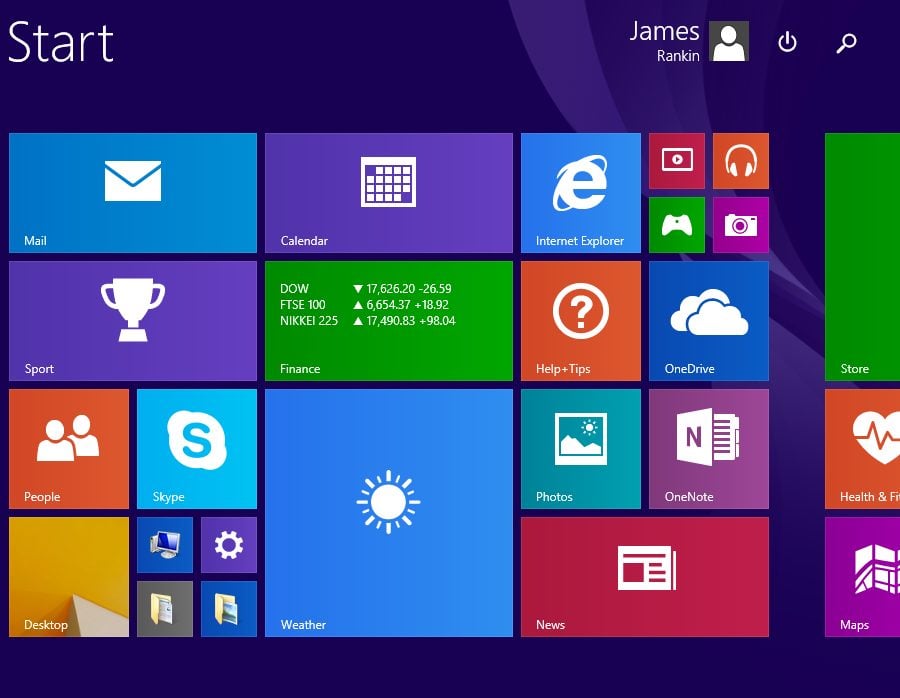
By the time you’ve finished, you should have something a lot better looking…note we’ve actually named the Groups on the Start Menu too, this is another setting we will be looking to roam successfully with Personalization Server.
So, we can now drop out to a bit of PowerShell and export this out to a file. Sounds promising! (Thanks to Aaron Parker’s blog for pointing me in the right direction of the PowerShell cmdlets required)
Now, this is where we need to start moving in different directions dependent on your profile type.
Exporting the default settings you have created
So obviously, we’ve logged on with an account and created the default Start Screen layout we want. Next, we need to export these out to a file – this will be done differently dependent on profile type.
Local profile with “flip-to-temp”
Should use
Export-StartLayout -As BIN -Path pathtoyourfile.bin
as shown in the example image below

Other profile type (mandatory, default, etc.)
Should use
Export-StartLayout -As XML -Path pathtoyourfile.xml
as shown in the example image below

Each of these commands will dump the file out to wherever we want it (network share is good, as is a folder that will be maintained on the base image in some way).
Importing in the settings for the user
Once we have the file exported in the required output type, we can set up an AppSense command or Action that is going to import it into the default, template or mandatory profile. Again, which profile type you are using will determine which way you do this.
Local profile with “flip-to-temp”
Because, in this situation, we want to import the settings from the BIN file we exported into the default profile (which will then be used to create the user’s profile each time they log on), we need to use a PowerShell cmdlet at Computer | Startup or Computer | Network Available (dependent on where you stored the BIN file you created, and what version of EM you are running)
The command is this
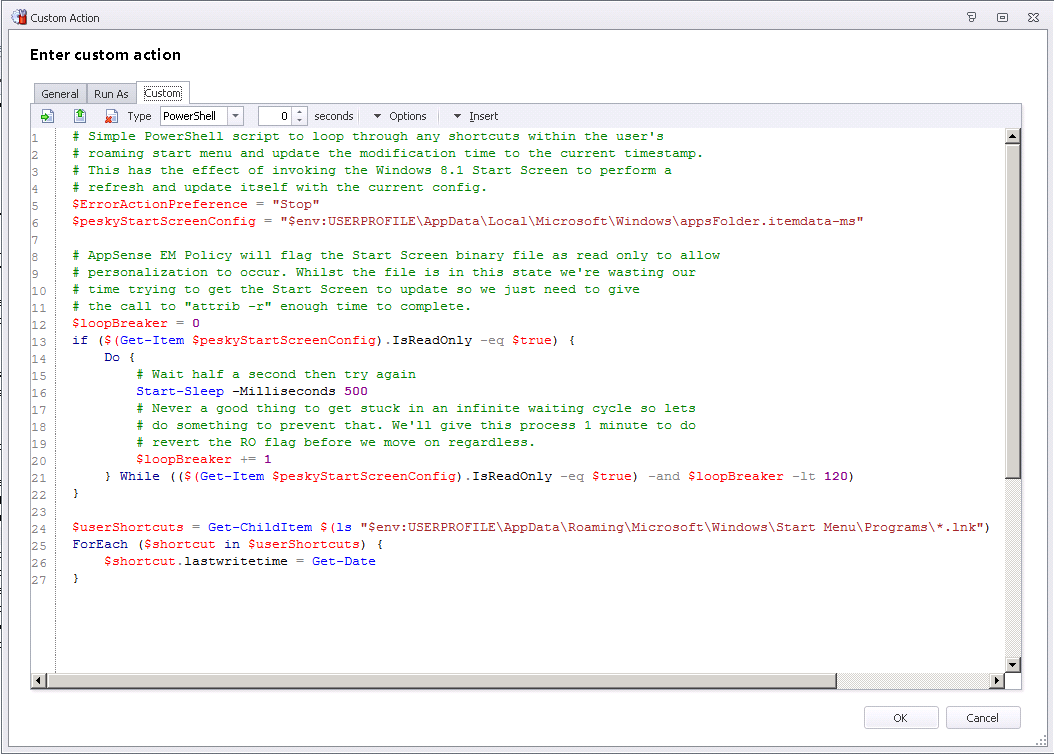
Now, as mentioned earlier, be aware that this command operates on the default profile on the machine. Essentially, we are modifying the Start Screen for the default profile (c:\Users\Default) as the device starts up.
Note that what this cmdlet does, under the hood, is simply bung an appsFolderLayout.BIN file into %SYSTEMDRIVE%\Users\Default\AppData\Local\Microsoft\Windows, so if the path doesn’t exist, then the cmdlet will fail. (This one burned me when I tried to be too clever with the default profile!)
This process is shown being done in AppSense EM in the images below

Once you’ve done this, it’s time to move onto getting Personalization to work – skip ahead to the section for “Getting the Start Screen to Personalize”.
Other profile type (mandatory, default, etc.)
If you’re using one of these profile types, importing in a default set of Start Screen tiles is going to be slightly more challenging. I’m using the word “slightly” rather lightly here 🙂
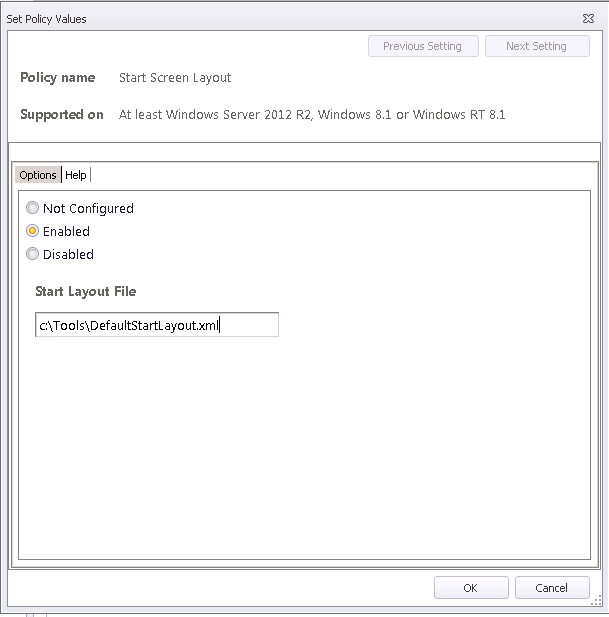
In order to import the files into a “pre-existing” profile, we can’t use the Import-StartLayout command – as we’ve said previously, that would simply set to work on the default profile, which obviously isn’t used in this case. We can, however, use the Start Screen Layout GPO, which uses the XML file we exported earlier.
The problem is, this GPO locks the Start Screen into read-only mode – meaning we can’t edit the Start Screen once we’ve logged in. Bit of a problem!
To get around the problem with the locked Start Screen, we are going to set the GPO to Enabled early in the logon process (setting up the default Start Screen), and then set it to Disabled later on in the process (allowing the user to change it). Nifty!
So, when the user logs on (we’re using the Logon | Pre-Desktop trigger from EM 8 FR 5 here), set the GPO through an EM ADMX Action, and specify the XML file that we created with Export-StartLayout. Note – you will need the Windows 8/Server 2012 GPO files, obviously, so a 2012 R2 DC may come in handy, or some file copying 🙂
And then, later on (we are going to add this to the old custom Post-Logon trigger, as it is necessary to resurrect this to get the Start Screen to Personalize – see next section for details) we will apply the same GPO again – except this time reverse it.
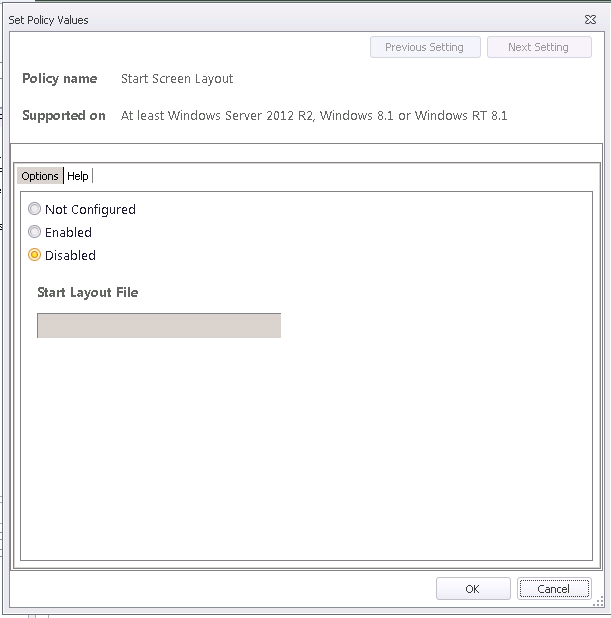
This means that when the user is logging in, the default items will be applied. However, because the GPO is then reversed, the lock is removed – allowing Personalization to be layered in, and the user to apply customizations. What you will notice is that there is a slight delay when the user can’t right-click on items on the Start Screen just after they log on – but it will allow them to do so after a few seconds/retries. It’s not ideal, but given what we have to work with, it’s as good as it’s going to get! Obviously, though, this will only be at first logon, because if you check the next paragraph, we’re going to set a flag to make sure it only runs once.
As I said, we don’t want this default layout to be applied every time, that would just cause problems. The idea is for it to apply the first time the user logs in, or if their Personalization is deleted. So we will set a Registry flag value after the GPO is applied the second time, and then it shouldn’t run again unless Personalization is deleted – as we are going to save this custom Registry key into the Personalization data too.<
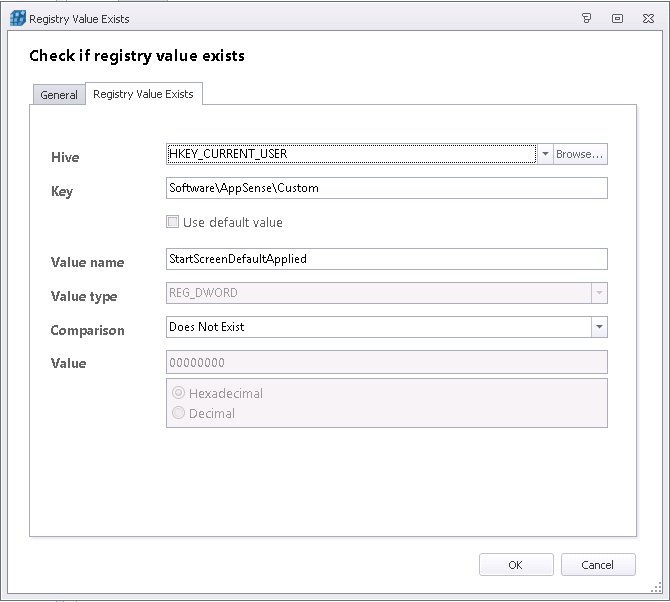 |
| The Registry value we’re checking for – and will then set |
Getting the Start Screen to Personalize – the return of the post-logon trigger?
However….to successfully Personalize Windows 8.1’s Start Screen brings with it a requirement that I didn’t think I would need again after EM 8 FR 5 shipped – that of the Post-Logon Offload Trigger (that’s what I christened it – others may have different terms for it). This is because once you’ve loaded the Personalized Start Screen, you need to refresh the shortcut files which exist within the {CSIDL_PROGRAMS} folder to get them to display properly. Now, the Desktop Created trigger which arrived in EM 8 FR 5 doesn’t run late enough to fulfil this requirement, so, annoyingly, it is back to the Post-Logon Offload Trigger (PLOT), the setup of which is described in detail in this post. Before you get started, set this up – you’re going to need it! Note to AppSense – I hope you’re building support for this into a Service Pack for EM 8 FR 5, as it looks like pretty poor show to have to bring it back after binning it was a headline feature for the upgrade in the first place. Yes, I thought we’d finally lost the PLOT – but it turns out we haven’t. Not by a long way 🙂
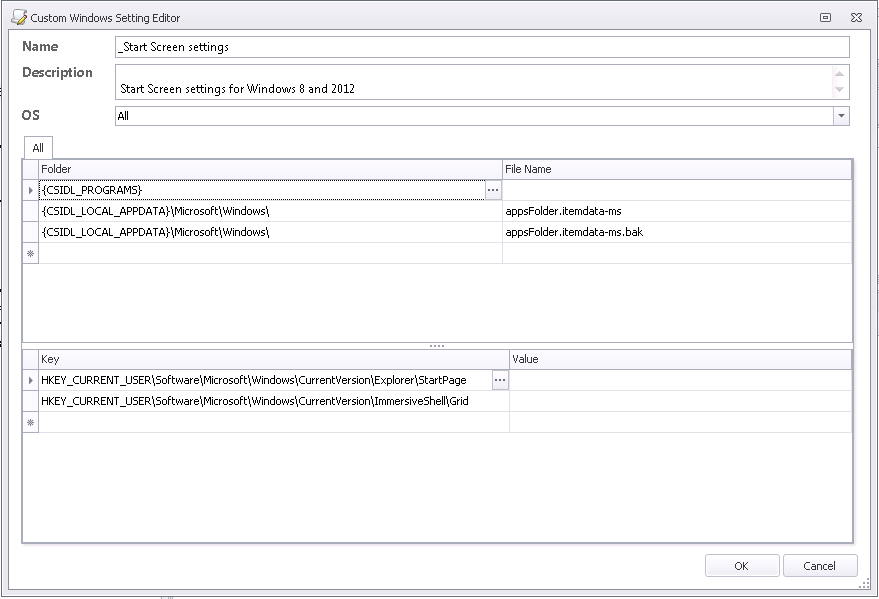
Once you’ve got the PLOT set up, you will need to set up your Windows Personalization Group (doing this on EM 8 FR 4 and below will be a bit trickier, but Richard’s blog post contains examples for earlier versions too, if you need them). The folders you will need to add into this are:-
{CSIDL_LOCAL_APPDATA}\Microsoft\Windows\appsFolder.itemdata-ms
{CSIDL_LOCAL_APPDATA}\Microsoft\Windows\appsFolder.itemdata-ms.bak
{CSIDL_PROGRAMS}
(The {CSIDL_PROGRAMS} is required to roam any folders that may be pinned to the Start Screen)
As for Registry keys, simply add these:-
HKEY_CURRENT_USER\Software\Microsoft\Windows\CurrentVersion\Explorer\StartPage
HKEY_CURRENT_USER\Software\Microsoft\Windows\CurrentVersion\ImmersiveShell\Grid
(The second entry adds the app sorting type, shown in the screenshot below)
This should leave your Windows Settings Group looking like this, which is then linked to the Windows Personalization Group (I set the Conditions on the Windows Personalization Group rather than the Windows Settings Group)
Don’t forget, if you’re using the non-local profile method, you will need to add your custom Registry value in here also, to ensure it is saved in the Personalization data!
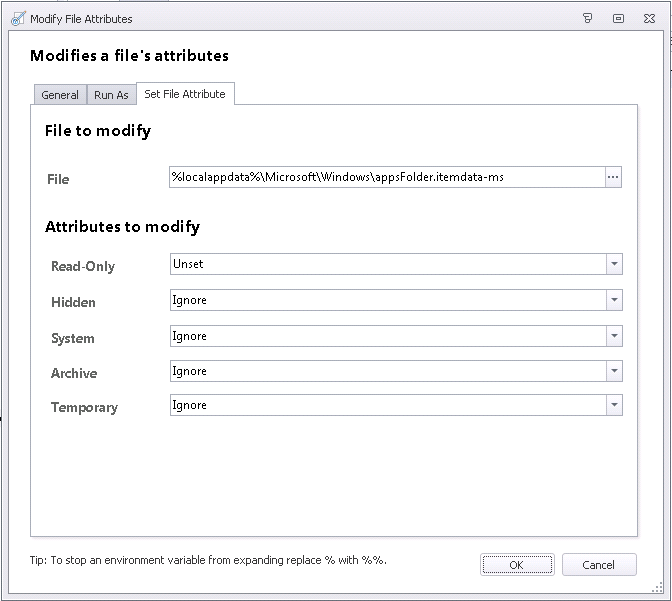
Now it’s over to the two Richards to take it from here! During logon, they will set the attributes on the two files used for the Start Screen – appsFolder.itemdata-ms and appsFolder.itemdata-ms.bak – to Read-Only, so that they can’t be arbitrarily overwritten…
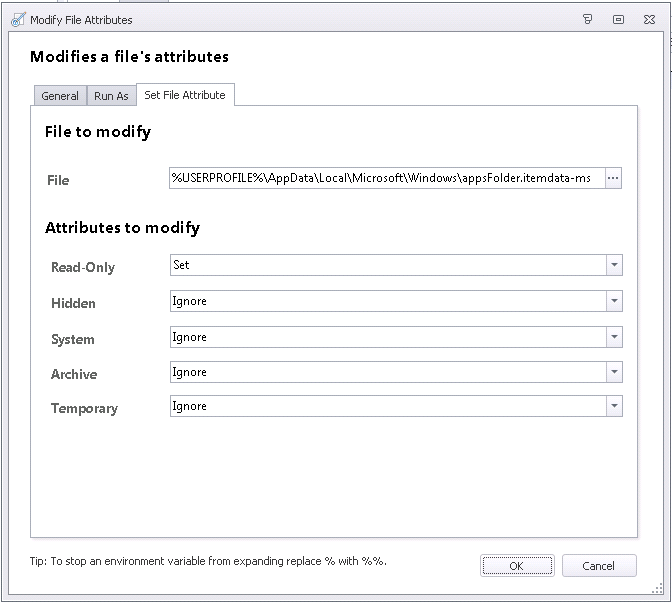
Then, once logon has finished and we’re into the Post-Logon Offload Trigger, they will unset the Read-Only attribute, so that the files can be Personalized…
And now the real voodoo starts…finally, there is a bit of VBScript that forces the Start Screen to refresh by “tickling” (love that term) the .lnk files in the {CSIDL_PROGRAMS} area. This seems to crack the final bit for us – much credit due to Richard Bancroft for this bit.
My testing seems to indicate that these two methods work, although it’s been done in a limited environment (Windows 8.1 VMs against EM 8 FR 5 instance on Hyper-V). The mandatory profile I used in testing was created on a Windows 8.1 machine, so you may see different results using older profile versions – however, as it says in my previous mandatory profiles article, it’s best to use the right profile version for the OS you’re working with.
 |
| OMG! It works (even Personalizing the childish group names) |
However – we need a summary, because this has been far too damned complicated and full of problems!
Summary
So, the main part of this article is backing up the excellent work done by Richard and Richard which gave us a way to Personalize the Start Screen correctly. What we were trying to achieve was putting in a default set of Start Screen items for users logging on for the first time, without actually re-editing the default or mandatory profile.
If you’re using a default profile (and also probably the flip-to-temp trick):
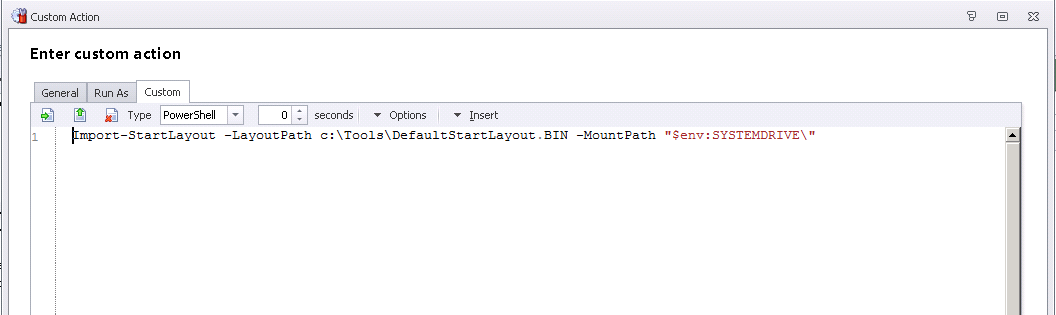
Use the process provided by Richard and Richard, and simply add a Custom Action to the Computer | Startup/Network Available trigger to run the following command
Import-StartLayout -LayoutPath pathtoyourfile.BIN -MountPath “$env:SYSTEMDRIVE\”
That’s all that’s required – Richard and Richard’s configuration will handle all of the rest.
If you’re using a mandatory/super-mandatory/default/other profile:-
During the Logon | Pre-Desktop trigger, check for the existence of the custom Registry value indicating the Start Screen has been imported. If it doesn’t exist, run an Action to set the Start Screen Layout GPO, using the XML file you exported as the template.
During the Post-Logon Offload Trigger (the Process Started for refreshnow.exe, if you’re using Richard and Richard’s config) check for the existence of the custom Registry value again. If it doesn’t exist, run an Action to set the GPO for Start Screen Layout again, this time disabling it. After this, set the custom Registry key so these Actions don’t run again.
I apologize for not making a configuration available for download yet (I will add one tomorrow sometime to make things easier). Richard Thompson has one available on his post – hopefully the one I put up should help add some extra features to it. Meanwhile, if you have any problems or questions, please leave a comment or drop me an email – I’d be interested to hear how well this works in the real world.
And with that – thank God that is over! I’m off to bed!

